|
Contents
History
|
|
The scale distance between
Burghausen to Kastl is just over three scale miles. If you refer to
the lower left photo, that’s Kastl to the left with Burghausen
on the right. There are three stations between the two. Starting at
Burghausen (that's part of Burghausen in the photo bottom
right)you travel around to the left to Wauldhausen, then move
on Gerten, Egstadt and finally on to Kastl. From Kastl you can reverse your
steps or change a set of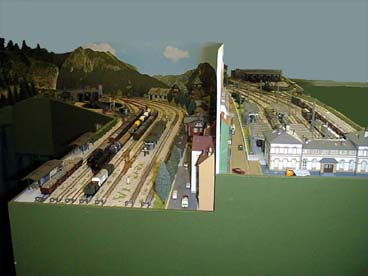 points at the yard throat and travel over the box Girder Bridge to off line. A similar ability to travel off line is also available to Burghausen. The off line yards, when viewed from this photo, are located to the right of Burghausen and run parallel and along the wall above my maintenance table and storage draws etc. points at the yard throat and travel over the box Girder Bridge to off line. A similar ability to travel off line is also available to Burghausen. The off line yards, when viewed from this photo, are located to the right of Burghausen and run parallel and along the wall above my maintenance table and storage draws etc.
To give the impression of a low relief track section I spray painted the track work in situ using Floquil's colour Rust. Silly for painting it in situ really, because I didn't protect the contact areas of the points and as a result experienced a lot of problems with continuity between the track and locomotives. The eight months operation prior to starting the layout scenery cleared a lot of these problems up, the majority of these failures occurring on the point areas. Funny old thing.
 On hindsight, (marvellous thing hindsight)I should have
masked these areas out with liquid masking, tape or grease or
something before I spray painted the railhead. Still,a valuable lesson learnt. I operated the layout for about eight months before I started the scenery work, mainly to identify as many anomalies as possible in the track work and also to sort out any track laying problems that one has a tendency to inadvertently introduce. Having said all that, I have experienced nothing but excellent rail running operation and point action from the Minitrix track products. On hindsight, (marvellous thing hindsight)I should have
masked these areas out with liquid masking, tape or grease or
something before I spray painted the railhead. Still,a valuable lesson learnt. I operated the layout for about eight months before I started the scenery work, mainly to identify as many anomalies as possible in the track work and also to sort out any track laying problems that one has a tendency to inadvertently introduce. Having said all that, I have experienced nothing but excellent rail running operation and point action from the Minitrix track products.
When gluing down ballast, most text book references advise applying a bonding medium, usually white wood bonding glue and water (with a drop or two of dishwashing liquid mixed in), with an eyedropper between the sleepers. I have found that I can apply the adhesive to the left and right edges of the track ballast and let the glue solution soak in toward the track centre naturally. I also use a dispensing plastic bottle, instead of the eyedropper, which means I can apply more adhesive for a longer period.
|